How to Set Up a Shared Craft Table for Neighbours
Set up a shared craft table with clear zones for tools, materials and works in progress, so neighbours can join in, find what they need and pack away calmly.
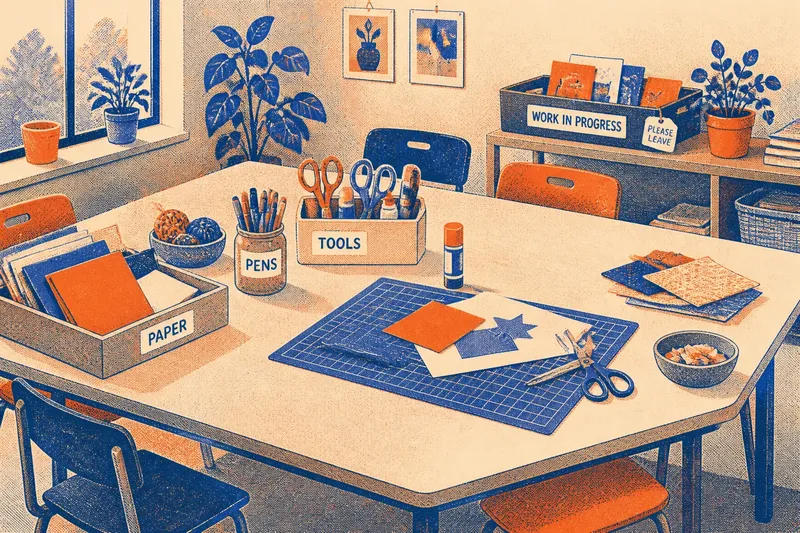
How do you set up a shared craft table so neighbours can find a tool, keep their work safe and leave enough room for everyone? A shared craft table works best when its layout answers those questions before the room fills. A few labelled containers, a clear tool area and an agreed place for unfinished work can make the session easier to host.
Give each part of the table a clear job
Before gathering supplies, decide what needs to happen on the table. Most neighbourhood sessions benefit from distinct areas for materials, tools, active work and pieces people want to set aside. These can be simple zones rather than marked-off squares: a tray at one end for paper, a jar for pens and a clear patch for cutting or arranging.
Keep containers low enough that people can see what is inside. A shallow box for card, a bowl for yarn and a reused tin for pencils are easier to browse than a pile of mixed supplies. Put labels on containers if visitors may not know where things belong; plain words such as “paper”, “tools” and “scraps” are enough.
Set shared tools where people can reach them without leaning across someone else’s work. If scissors or glue are needed, keep them together in a visible spot and leave room beside them for someone to use them. Follow the venue’s rules and the product labels for any tool or material that needs particular handling.
Separate materials from active work
A busy table can become hard to use when fresh supplies, tools and half-finished pieces all compete for the same patch of space. Keep the main working area clear at the start, and choose a separate resting place for work in progress. A side table, labelled tray or shelf can serve this purpose if people can still identify their own pieces.
Agree how makers can mark work they plan to return to. A name card, a small paper tag or a simple “please leave” note can prevent a piece being mistaken for spare material during tidy-up. Ask the maker before moving anything that is not clearly marked.
Say you have a folding table, one shallow box of card, a jar of pens, scissors, glue sticks and a nearby shelf. You put the card at one end, the tools beside it, leave the centre open for working and place a tray on the shelf for unfinished pieces. When a neighbour pauses to chat, they can move their labelled paper shape to the tray, leaving the central surface free for the next person.
Check the layout before people arrive
Walk around the table as if you were coming to it for the first time. Check that a visitor can see the supplies, reach what they need and understand where a piece can rest. If the room is tight, move extra stock off the table rather than letting containers crowd the work area.
- Check sightlines: Can people see what is in each container? If not, use shallow trays or clearer labels; if the containers are already easy to read, leave them in place.
- Check reach: Can people pick up shared tools without reaching across someone’s work? If not, move the tools to an open edge; if they are accessible from several seats, keep that arrangement.
- Check the work surface: Is there a clear patch for arranging or cutting? If not, remove spare supplies to a side surface; if the centre is open, avoid filling it with display pieces.
- Check the resting place: Can someone set aside an unfinished piece without confusing it with scraps? If not, add a labelled tray or shelf; if the space is already clear, tell guests how to use it.
- Check the labels: Would a first-time visitor know where tools and materials belong? If not, add plain-word labels; if the containers are self-explanatory, keep the table uncluttered.
- Check the route around the table: Can people move in and out without squeezing past a chair or bag? If not, shift furniture or belongings; if the route is clear, leave it open during the session.
What should the host decide before opening the table?
Where should shared tools go?
Put frequently used tools in a visible spot that people can reach without crossing another person’s work. If a tool needs supervision or has venue-specific rules, keep it where the host can manage it.
How should unfinished work be stored?
Choose a tray, shelf or side table and tell guests how to mark a piece they intend to keep. If there is no safe place to leave work, ask makers to take their pieces with them rather than promising storage.
What if the table is too small?
Move reserve materials to a nearby surface and bring over only what people are using. If space remains tight, offer a clear side surface for arranging work or make room by removing display items.
How can guests find their way around without a long explanation?
Use a few plain labels and give a short welcome that points out the tools, materials and resting place. If visitors still seem unsure, show them where a particular item belongs without rearranging their work.
Reset the table without losing useful information
Near the end of the gathering, let people know that tidy-up is approaching. Ask each maker what should happen to their work before moving it. Return tools to their container, keep reusable offcuts separate from rubbish and leave any unclaimed piece untouched until its status is clear.
Afterwards, notice which parts of the layout worked and which caused a pause. If several people searched for tape, bring it into view next time; if the central area stayed crowded, reduce the supplies left out. These small adjustments make the shared craft table easier to use without turning it into a rigid arrangement.
For a shared craft table, the most useful setup is not the most elaborate one. Keep the tools findable, the working surface open and the resting place unmistakable. That arrangement gives neighbours a practical way to share a table, even when their projects and pace differ.